A seam guide is an essential tool for sewing machines‚ ensuring precision and consistency in stitching. It helps maintain accurate seam allowances‚ enhancing sewing efficiency and professionalism greatly.
1.1 What is a Seam Guide?
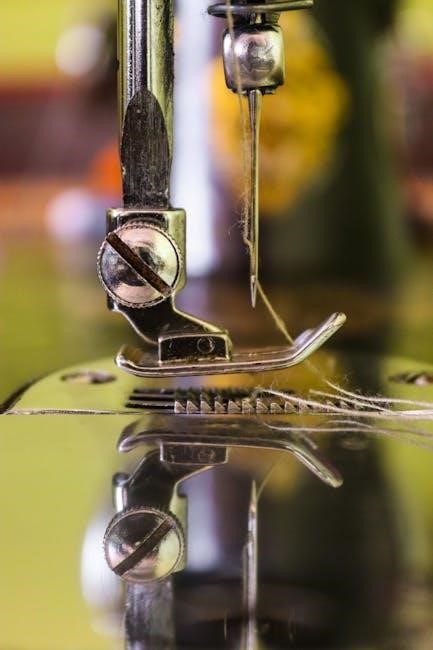
A seam guide is a practical tool designed to assist sewists in achieving precise and consistent stitching. It is typically attached to the sewing machine’s throat plate or needle plate‚ serving as a visual marker to align fabric edges. This accessory ensures that seam allowances remain uniform‚ which is crucial for professional-looking results. Seam guides come in various forms‚ including built-in‚ magnetic‚ or custom designs‚ each offering unique benefits. Magnetic seam guides‚ for instance‚ are easy to attach and adjust‚ making them a popular choice for both beginners and experienced sewists. By providing a clear reference point‚ a seam guide helps maintain straight lines and accurate stitching‚ enhancing overall sewing efficiency and reducing errors.
1.2 Importance of Using a Seam Guide
Using a seam guide significantly enhances sewing accuracy and efficiency. It helps maintain consistent seam allowances‚ reducing errors and the need for costly rework. This tool is especially beneficial for beginners‚ providing a clear visual reference to align fabric edges properly. Professionals also appreciate the time-saving aspect‚ as it streamlines the sewing process and ensures precise results. Additionally‚ a seam guide minimizes fabric waste by preventing uneven stitching. Its versatility across various fabric types‚ from delicate materials to heavy-duty textiles‚ makes it an indispensable asset for any sewing project. By ensuring straight lines and uniform seams‚ a seam guide elevates the quality of finished garments and home decor items‚ making it a must-have accessory for sewists of all skill levels.
1.3 Brief History of Seam Guides in Sewing
The concept of seam guides dates back to the early days of sewing machines‚ evolving alongside textile technology. Initially‚ seam guides were simple markings on the needle plate or attachments to help sewists maintain consistent seam allowances. Over time‚ the development of magnetic and adjustable seam guides revolutionized sewing‚ offering greater precision and versatility. The introduction of modern materials and designs further enhanced their functionality‚ making them indispensable for both professional and home sewists. Today‚ seam guides are available in various forms‚ catering to diverse sewing needs‚ from quilting to garment construction. Their evolution reflects the continuous quest for accuracy and efficiency in sewing‚ benefiting sewists across generations and skill levels.
Types of Seam Guides
Seam guides come in various forms‚ including built-in‚ magnetic‚ and custom designs. Each type offers unique benefits‚ catering to different sewing needs and machine compatibility requirements effectively.
2.1 Built-in Seam Guides
Built-in seam guides are pre-installed features on many sewing machines‚ offering convenience and ease of use. These guides are typically marked on the machine’s throat plate‚ providing clear indicators for common seam allowances such as 1/4-inch or 1/2-inch seams. They are especially useful for maintaining consistent stitching and straight lines‚ making them ideal for both beginners and experienced sewists. Some machines also feature adjustable built-in guides‚ allowing users to customize seam widths for various projects. These integrated tools eliminate the need for additional accessories‚ streamlining the sewing process and ensuring accuracy. Built-in seam guides are a practical solution for achieving professional results with minimal effort.
2.2 Magnetic Seam Guides
Magnetic seam guides are versatile tools designed to attach securely to the throat plate of a sewing machine. They provide clear visibility and stability‚ ensuring accurate fabric alignment. These guides are easy to install and adjust‚ allowing sewists to maintain consistent seam allowances effortlessly. Unlike built-in guides‚ magnetic versions can be moved or removed as needed‚ offering flexibility for various projects. They are particularly useful for maintaining straight stitching lines and are compatible with most metal sewing machine surfaces. Magnetic seam guides are ideal for sewists who value precision and convenience‚ making them a popular choice among both hobbyists and professionals. Their adaptability and ease of use enhance the sewing experience‚ ensuring high-quality results.
2.3 Custom and DIY Seam Guides
Custom and DIY seam guides offer tailored solutions for specific sewing needs. Sewists can create their own guides using materials like metal strips‚ adhesive-backed magnets‚ or even fabric. These personalized tools allow for precise adjustments‚ catering to unique projects or fabric types. For instance‚ a DIY guide can be designed with specific measurements or angled edges for curved seams. Online tutorials often provide step-by-step instructions‚ making it accessible for sewists of all skill levels. By crafting their own guides‚ users can ensure compatibility with their sewing machines and address specific challenges‚ enhancing their overall sewing experience with creativity and functionality. This approach fosters innovation and adaptability‚ making every project more efficient and enjoyable.
How to Use a Seam Guide
A seam guide helps align fabric for consistent stitching. Attach it to your machine’s throat plate‚ ensuring accurate seam allowances for straight or curved lines effortlessly.
3.1 Attaching the Magnetic Seam Guide
To attach a magnetic seam guide‚ first ensure your sewing machine’s throat plate is metal and clean. Place the guide on the plate‚ aligning its edge with your desired seam allowance. The magnetic strip will securely hold it in place. For curved seams‚ position the guide so it aligns with the curve’s starting point. This ensures smooth fabric flow. If your machine lacks a built-in guide‚ the magnetic option provides flexibility and ease of use‚ allowing quick adjustments for various projects. Always test the placement with scrap fabric before sewing actual pieces for optimal accuracy.
3.2 Setting Up the Seam Guide for Different Seam Allowances
To set up a seam guide for different seam allowances‚ align the fabric edge with the guide’s marked measurements. For a 1/4-inch allowance‚ position the fabric so its edge aligns with the 1/4-inch marking. Adjust the guide by sliding it along the throat plate or needle plate until the desired measurement matches the fabric edge. Use the guide’s scale to ensure accuracy. For curved seams‚ align the guide with the starting point of the curve. Always test the setup with scrap fabric to confirm the seam width before sewing your final project. This ensures consistent and precise stitching‚ saving time and improving overall results.
3.3 Sewing Straight Lines with Precision
Sewing straight lines with precision is simplified using a seam guide. Align the fabric edge with the guide’s marking‚ ensuring it stays consistent as you sew. Magnetic seam guides attach securely to the throat plate‚ preventing movement. For straight stitching‚ keep the fabric edge aligned with the guide‚ maintaining steady pressure. This ensures uniform seam allowances and prevents deviations. The guide’s visibility allows for clear alignment‚ reducing errors. It is particularly useful for long seams‚ where maintaining straightness can be challenging. By following the guide‚ you can achieve professional-looking results with ease and confidence‚ making it an indispensable tool for both beginners and experienced sewists.
3.4 Adjusting the Guide for Curved Seams
Adjusting the seam guide for curved seams requires precise alignment to ensure smooth stitching. Begin by setting the guide behind the needle‚ aligning its edge with the desired curve. For accurate results‚ draw a line along the guide’s edge to mark the turning point. This helps maintain consistent stitching as you navigate the curve. Magnetic guides can be repositioned easily‚ allowing flexibility for intricate designs. When sewing‚ keep the fabric edge aligned with the guide‚ moving it gradually to follow the curve. This technique enhances control and accuracy‚ ensuring professional-looking results. Regularly check the guide’s position to maintain consistent seam allowances‚ especially on complex patterns.
Benefits of Using a Seam Guide
Using a seam guide enhances stitching accuracy‚ saves time‚ and ensures consistent seam allowances. It also improves efficiency for both beginners and professionals‚ reducing errors and boosting productivity.
4.1 Improved Accuracy in Sewing
Using a seam guide significantly enhances sewing accuracy by ensuring consistent seam allowances and straight stitching. It minimizes human error‚ especially for beginners‚ by keeping fabric aligned with the edge of the guide. The magnetic seam guide‚ for instance‚ attaches securely to the sewing machine’s throat plate‚ preventing movement during sewing. This tool is particularly useful for maintaining precise stitch lines‚ which is crucial for professional results. Additionally‚ the guide’s visibility helps sewists follow patterns accurately‚ reducing the need for repeated measurements. Its versatility across various fabric types further boosts accuracy‚ making it an invaluable asset for both casual and professional sewing projects; By eliminating guesswork‚ the seam guide ensures that every stitch is placed exactly where intended‚ leading to flawless finished products.
4.2 Time-Saving for Beginners and Professionals
A seam guide is a time-saving tool for both beginners and experienced sewists. It eliminates the need for constant adjustments and measurements‚ allowing for smoother workflow. Beginners benefit from reduced learning curves‚ as the guide provides clear visual cues for maintaining consistent seam allowances. Professionals appreciate the efficiency it brings‚ as it minimizes the time spent monitoring fabric alignment. This tool ensures that even complex projects are completed quickly and accurately. By streamlining the sewing process‚ a seam guide enables sewists to focus on creativity and technique rather than tedious adjustments‚ making it an indispensable asset for anyone looking to save time without compromising on quality.
4.3 Versatility in Different Fabric Types
A seam guide offers exceptional versatility across various fabric types‚ ensuring consistent results whether sewing delicate silks or heavy canvases. Its adaptability allows it to guide fabrics of different thicknesses and textures smoothly. Magnetic guides‚ for instance‚ are particularly effective on metal sewing machine parts‚ providing stability even with slippery materials like vinyl or leather. This feature is especially beneficial for projects requiring precise seam allowances‚ such as quilting or garment construction. By maintaining consistent fabric alignment‚ a seam guide enhances the overall quality of the finish‚ regardless of the fabric type. This versatility makes it an indispensable tool for sewists working with diverse materials and projects.
4.4 Enhanced Consistency in Seam Allowances
A seam guide ensures uniformity in seam allowances‚ a critical factor for professional results. By maintaining precise alignment‚ it prevents uneven stitching‚ which can ruin a project. Magnetic guides attach securely to the machine’s throat plate‚ offering stability and consistency. This tool is especially useful for beginners‚ helping them achieve accurate seams effortlessly. Even experienced sewists benefit from its reliability‚ as it streamlines the sewing process and reduces errors. Consistent seam allowances are vital for fitting garments correctly and ensuring durability. With a seam guide‚ achieving professional-level consistency becomes straightforward‚ making it an invaluable accessory for any sewing project.
Choosing the Right Seam Guide
Selecting the right seam guide involves considering compatibility with your sewing machine‚ ease of use‚ durability‚ and versatility for different fabric types and seam allowances.
5.1 Factors to Consider When Selecting a Seam Guide
When choosing a seam guide‚ consider compatibility with your sewing machine‚ ease of installation‚ and durability. Magnetic guides are popular for their strong hold and easy adjustment‚ while custom guides offer precision for specific projects. Ensure the guide suits various fabric types and seam allowances‚ from delicate materials to thick textiles. Portability and storage options are also important‚ as well as user reviews and recommendations. Opting for a guide with clear markings enhances accuracy‚ making it easier to achieve straight lines and consistent stitching. Always check if the guide is universally compatible or designed specifically for your machine model to ensure optimal performance and longevity.
5.2 Compatibility with Your Sewing Machine
Ensuring your seam guide is compatible with your sewing machine is crucial for optimal performance. Magnetic guides are ideal for metal throat plates‚ while others may require specific attachments. Check if the guide is universally compatible or designed for your machine model. For older or industrial machines‚ verify the guide’s adaptability. Test the guide on scrap fabric first to ensure it aligns properly and doesn’t damage the machine. Consider guides with adjustable features for versatility. Always refer to your machine’s specifications to confirm compatibility‚ ensuring smooth operation and precise stitching. Proper fit ensures accurate seam allowances and prevents potential damage to your machine or fabric.
5.3 Reviews and Recommendations
Reading reviews and seeking recommendations is a smart way to find the best seam guide for your sewing machine. Magnetic seam guides are highly praised for their visibility and ease of use. Many users recommend the Madam Sew Sewing and Quilting Seam Guide Ruler for its versatility in measuring seam allowances from 1/8 to 2 inches. The 3 Pack Magnetic Seam Guide is another popular choice‚ offering durability and adaptability across various machines. Users often highlight how these guides improve sewing efficiency‚ especially for long seams. When shopping‚ check ratings and read testimonials to ensure the guide meets your needs. Recommendations from sewing communities or forums can also provide valuable insights‚ helping you make an informed decision tailored to your sewing style and machine type.
Customizing Your Seam Guide
Customizing your seam guide enhances its functionality‚ allowing you to tailor it to specific projects and fabric types. Create your own guide using metal strips or printed designs‚ ensuring precise seam allowances and improved accuracy. Adding specific markings or adjusting the length can optimize its versatility for various sewing tasks. This personalization ensures the guide meets your unique sewing needs‚ making it an indispensable tool for both beginners and professionals. By modifying or creating your own guide‚ you can achieve consistent results and streamline your sewing process effectively.
6.1 Making Your Own Custom Seam Guide
Creating a custom seam guide allows you to tailor it to your specific sewing needs. Start by measuring the desired seam allowance and marking it on a sturdy material like metal or plastic. Use a ruler or caliper for precision. Cut the material to the required size‚ ensuring it fits securely on your sewing machine’s throat plate. For magnetic guides‚ attach a strong magnet to the base; Sand or file the edges for smoothness. You can also add markings for different seam allowances‚ making it versatile for various projects. This DIY approach saves money and ensures compatibility with your machine‚ providing a personalized sewing experience.
6.2 Tips for Modifying Existing Seam Guides
Modifying a seam guide can enhance its functionality. Start by adding clear markings for different seam allowances using paint or a permanent marker. For dual seam allowances‚ attach a small additional guide alongside the existing one. Consider adding a pivot point for curved seams by drilling a small hole and inserting a metal pin. Ensure the guide remains flush with the machine’s throat plate to prevent fabric bunching. Test modifications on scrap fabric before sewing actual projects. These tweaks can personalize the guide to your sewing style‚ improving accuracy and efficiency across various projects. Always ensure modifications don’t obstruct the machine’s moving parts‚ maintaining safety and performance.
6.3 Adding Markings for Specific Seam Allowances
Adding custom markings to your seam guide allows for precise adjustments. Use a permanent marker or stickers to indicate common seam allowances like 1/4 inch or 1/2 inch. Place markings along the edge of the guide‚ ensuring they align with the needle’s position. For accurate alignment‚ test the markings on scrap fabric before sewing. This customization helps maintain consistent seam widths‚ especially for projects requiring specific allowances. By clearly marking your guide‚ you can quickly switch between different allowances without recalibrating the entire setup. This simple modification enhances efficiency and reduces errors‚ making it a valuable tweak for both beginners and experienced sewists.
Maintenance and Care
Regularly clean the seam guide with a soft cloth and mild detergent. Store it in a dry place to prevent rust or damage. Avoid harsh chemicals.
7.1 Cleaning the Seam Guide
Regular cleaning of the seam guide is crucial to maintain its accuracy and longevity. Use a soft‚ dry cloth to gently wipe away dust and debris. For tougher stains‚ dampen the cloth with distilled water‚ but avoid soaking the guide. Never use harsh chemicals or abrasive cleaners‚ as they may damage the material or magnetic properties. For magnetic seam guides‚ ensure the surface remains dry to preserve magnetism. After cleaning‚ inspect for any residue and allow the guide to air dry completely before reattaching it to your sewing machine. Regular maintenance ensures precise stitching and extends the life of your seam guide.
7.2 Storing the Seam Guide Properly
Proper storage of your seam guide is essential to maintain its functionality and prevent damage; Store it in a dry‚ cool place away from direct sunlight to avoid warping or discoloration. For magnetic seam guides‚ avoid exposure to strong magnetic fields or electronic devices‚ as this may weaken the magnet; Place the guide in a protective case or pouch to prevent scratches and dust accumulation. If storing for an extended period‚ ensure it is clean and completely dry. Avoid bending or flexing the guide‚ as this may cause permanent damage. Proper storage ensures your seam guide remains accurate and ready for use when needed‚ extending its lifespan and reliability.
7.3 Troubleshooting Common Issues
Common issues with seam guides often relate to alignment or magnetic strength. If the guide loses its magnetic grip‚ clean the needle plate and ensure it’s free from debris. Avoid exposure to heat or other magnets‚ as this can weaken the magnetic seam guide. For alignment problems‚ double-check that the guide is positioned correctly relative to the needle. If fabric shifts during sewing‚ ensure the guide is securely attached and fabric is fed smoothly. For built-in guides‚ verify calibration with the machine’s settings. Regular cleaning and proper storage can prevent most issues. If problems persist‚ consider recalibrating or consulting your sewing machine’s manual for guidance. Proper care ensures optimal performance and longevity of your seam guide.

Advanced Techniques
Advanced techniques involve mastering curved seams‚ using multiple guides for complex patterns‚ and combining guides with other tools for precise stitching and professional finishes.
8.1 Sewing Curves with a Seam Guide
Sewing curves with a seam guide requires precise alignment and adjustment. Attach the magnetic guide to the needle plate‚ ensuring it aligns with the edge of the fabric. For smooth curves‚ set the guide to match the turning point‚ keeping it horizontal to the needle. Use the markings on the guide to maintain consistent seam allowances. As you sew‚ gently guide the fabric‚ allowing the machine to follow the curve naturally. This technique ensures even stitching and professional-looking results‚ especially for garments or home decor projects. Regular practice enhances control and accuracy when handling curved seams with a seam guide.
8.2 Using Multiple Seam Guides for Complex Projects
For intricate sewing projects‚ using multiple seam guides can enhance precision and organization. Attach one guide for straight seams and another for curved or angled edges‚ ensuring consistent alignment. This setup is particularly useful for quilting‚ tailoring‚ or large-scale fabric works. When working with layered fabrics or complex patterns‚ multiple guides help maintain accurate seam allowances across different sections. Position each guide strategically to avoid interference‚ allowing smooth fabric flow. This method streamlines the sewing process‚ reducing errors and saving time. It’s especially beneficial for projects requiring varied seam widths or precise matching of patterns. By leveraging multiple guides‚ sewists can achieve professional-level results with greater efficiency and confidence.
8.3 Combining Seam Guides with Other Sewing Aids
Combining seam guides with other sewing aids enhances precision and efficiency in complex projects. Pairing a magnetic seam guide with a quilting bar or edge joiner ensures smooth handling of bulk fabrics and maintains consistent seam allowances. Using a walking foot alongside a seam guide is ideal for thick materials‚ preventing fabric shifting. Additionally‚ incorporating laser guides or stitch-in-the-ditch rulers with seam guides helps in aligning patterns and stitching perfectly. This multi-tool approach minimizes errors‚ especially in quilting or home decor projects. By integrating these aids‚ sewists can achieve professional results‚ ensuring straight lines and accurate seams effortlessly. This combination is a game-changer for intricate designs‚ offering unmatched control over fabric movement and alignment.
A seam guide is an indispensable tool for sewing machines‚ ensuring accuracy‚ efficiency‚ and consistency. It enhances sewing quality‚ making it essential for both professionals and beginners alike.
9.1 Summarizing the Importance of Seam Guides
Seam guides are indispensable for achieving precision and consistency in sewing. They enhance accuracy by maintaining consistent seam allowances‚ reducing errors‚ and saving time. Whether for straight lines or curves‚ they ensure professional results. Magnetic seam guides are particularly versatile‚ attaching easily to most machines and providing clear alignment. Custom guides offer flexibility for specific projects‚ while built-in guides streamline the process; For beginners‚ they simplify learning‚ while professionals rely on them for efficiency. Overall‚ seam guides are a must-have for any sewer‚ improving the quality and consistency of every stitch. They are a simple yet powerful tool that elevates sewing projects to the next level of excellence.
9.2 Final Tips for Maximizing Seam Guide Efficiency
To maximize seam guide efficiency‚ always ensure proper placement and alignment on your sewing machine. Regularly clean and maintain the guide to prevent dust or debris from affecting accuracy. For magnetic guides‚ check compatibility with your machine’s throat plate to avoid any issues. Experiment with different types of guides‚ such as custom or magnetic‚ to find what suits your projects best. Additionally‚ combine seam guides with other sewing aids‚ like specialized feet‚ for enhanced precision. Finally‚ practice using the guide on scrap fabric to refine your technique and adapt to various seam allowances. This approach will help you achieve consistent‚ professional results in all your sewing projects.