Self-cleaning GE ovens provide an eco-friendly solution by using high temperatures to turn grime into ash, simplifying maintenance without harsh chemicals and enhancing efficiency for modern kitchens.
What Is a Self-Cleaning Oven?
A self-cleaning oven is a feature-rich appliance designed to simplify oven maintenance by using high temperatures to convert food residue into ash. This eco-friendly process reduces the need for harsh chemicals, making cleaning more efficient. The oven achieves this by heating to extreme temperatures, typically around 880°F, breaking down grime and food particles into a manageable ash residue. This innovative feature minimizes manual scrubbing and is ideal for busy households seeking a low-maintenance solution. It’s a convenient and modern approach to keeping your oven spotless without the hassle of traditional cleaning methods.
Benefits of Self-Cleaning Ovens
Self-cleaning ovens offer numerous advantages, making them a practical choice for modern kitchens. They simplify oven maintenance by eliminating the need for harsh chemicals, reducing manual scrubbing efforts. The high-temperature cleaning process effectively turns grime into ash, which is easy to wipe away. This feature saves time and effort, especially for busy households. Additionally, self-cleaning ovens are eco-friendly, as they minimize chemical use and reduce waste. They also maintain oven efficiency by removing residue that could affect performance. Overall, they provide a convenient, low-maintenance solution for keeping your oven clean and hygienic.
How Self-Cleaning Ovens Differ from Steam-Cleaning Ovens
Self-cleaning and steam-cleaning ovens differ in their cleaning methods. Self-cleaning ovens use extremely high temperatures, often above 800°F, to burn food residue into ash, which is then wiped away. Steam-cleaning ovens, on the other hand, use steam to loosen grime, requiring less heat and manual scrubbing afterward. Self-cleaning ovens are more efficient for heavy-duty cleaning but may require longer cycles and proper ventilation due to smoke and fumes. Steam cleaning is gentler and faster but may not handle tough grime as effectively. Both methods aim to simplify oven maintenance but cater to different cleaning needs and preferences.
Understanding the Self-Cleaning Process
Self-cleaning GE ovens use high heat to burn food residue into ash, eliminating grime without chemicals, while ensuring efficient and safe cleaning for your oven interior.
How Self-Cleaning Ovens Work
Self-cleaning ovens use high temperatures to reduce food residue to ash. By locking the door and activating the self-clean mode, the oven heats to around 880°F, burning grime. This process eliminates the need for harsh chemicals, making cleaning efficient and eco-friendly. Proper preparation, like removing racks and ensuring the oven is empty, is essential for optimal results and safety. Follow manufacturer guidelines to avoid damage and ensure effective cleaning. Regular use of this feature helps maintain your oven’s performance and appearance.
Temperature Levels During Self-Cleaning
Self-cleaning ovens reach extremely high temperatures, typically around 880°F, to incinerate food residue into ash. This intense heat ensures thorough cleaning without chemicals. The oven door locks to contain heat and fumes. Proper ventilation is crucial to prevent smoke and odor buildup. Always follow the manufacturer’s temperature guidelines to avoid damage. The self-clean cycle duration varies, but high heat guarantees effective grime removal. Ensure safety by keeping the kitchen well-ventilated during this process. This feature makes maintenance effortless and energy-efficient for GE oven users.
What Happens to Food Residue During Self-Cleaning
During the self-cleaning cycle, food residue is exposed to extreme heat, typically around 880°F, causing it to burn into a fine ash. This process eliminates the need for scrubbing, as most grime is reduced to a powdery residue that can be easily wiped away. However, heavier buildup may not fully turn to ash and might require light manual cleaning afterward. Ensuring the oven is empty before starting the cycle is crucial for optimal results and safety. This high-heat method is efficient and chemical-free, making maintenance straightforward.
Preparation for Self-Cleaning
Before initiating the self-cleaning process, remove oven racks and accessories, ensuring the oven is completely empty. This step is crucial for effective and safe cleaning.
Removing Oven Racks and Accessories
Before starting the self-cleaning process, remove all oven racks and accessories to prevent damage and ensure optimal cleaning. Place racks in the sink or dishwasher for separate cleaning. This step allows the high temperatures to effectively target grime without obstruction. Always follow the manufacturer’s guidelines for rack removal and replacement, as specified in the owner’s manual. Proper preparation ensures a seamless and efficient self-cleaning cycle.
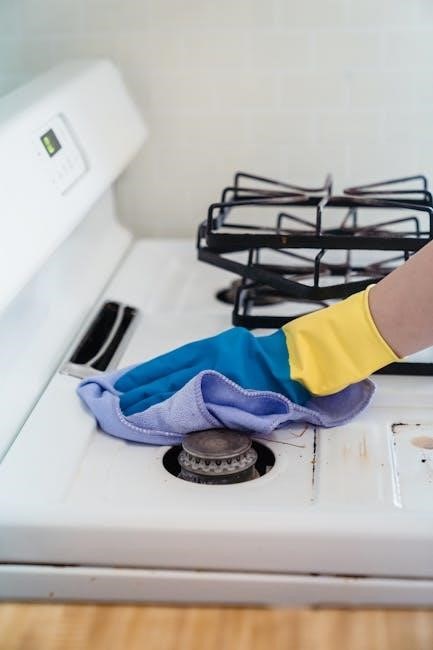
Cleaning Heavy Grime Before Self-Cleaning
For ovens with heavy grime buildup, pre-cleaning is essential. Use a damp cloth to wipe down large food particles and avoid clogging the oven during the self-cleaning cycle. Avoid abrasive cleaners or harsh chemicals, as they can damage the interior finish. Instead, gently scrape off excess debris. This step ensures the self-cleaning process is more effective and prevents excessive smoke or odors. Always refer to the owner’s manual for GE-specific recommendations on pre-cleaning methods. This preparation enhances the efficiency of the self-cleaning feature and protects your appliance.
Ensuring the Oven is Empty
Before initiating the self-cleaning process, it’s crucial to ensure the oven is completely empty. Remove all racks, baking sheets, utensils, and food items. Leaving anything inside can cause damage or create excessive smoke during high-temperature cleaning. Double-check for any forgotten items, as the extreme heat can warp metal or melt plastic. A clean slate allows the self-cleaning feature to work efficiently and safely. This step is vital for optimal performance and to avoid potential hazards. Always verify the oven is empty before locking the door and starting the cycle.
Safety Precautions
Always wear protective gloves and eyewear during the self-cleaning process. Ensure proper ventilation to avoid inhaling fumes and never leave the kitchen unattended while the oven cleans.
Importance of Ventilating the Kitchen
Ventilating the kitchen is crucial during the self-cleaning process to prevent harmful fumes from accumulating. Open windows and turn on exhaust fans to ensure fresh air circulation. This step helps protect both you and your home from potential respiratory irritation caused by smoke and toxic particles released during high-temperature cleaning. Proper ventilation also prevents lingering odors and maintains a safe cooking environment. Always prioritize ventilation to ensure a safe and effective self-cleaning experience for your GE oven.
Protective Gear and Safety Measures
When using the self-cleaning feature on your GE oven, it’s essential to wear protective gear to avoid burns and exposure to harmful fumes. Use oven mitts or heat-resistant gloves to handle racks or accessories after cleaning. A face mask can help filter out particles released during the process. Keep children and pets away from the oven while it’s in self-clean mode. Ensure proper ventilation to prevent inhaling toxic fumes. These precautions protect you from extreme heat and potential respiratory irritation, ensuring a safer cleaning experience.
Locking the Oven Door Before Cleaning
Locking the oven door is a critical safety measure when using the self-cleaning feature on your GE oven. This ensures that the extreme heat and fumes generated during the cycle are contained within the oven. Failure to lock the door can lead to exposure to toxic fumes or potential fires. The door will automatically lock once the self-clean mode is activated, but double-checking is always a good idea. This feature prevents accidental burns and ensures the cleaning process is both effective and safe. Always follow this step to avoid any risks.
Step-by-Step Self-Cleaning Instructions
Start by removing racks and ensuring the oven is empty. Activate self-clean mode, monitor the process, let it cool, then wipe down the oven interior thoroughly.
Step 1: Preparing the Oven
Begin by removing all oven racks, shelves, and accessories, as high heat can damage them. Ensure the oven is completely empty, including food debris, to prevent smoke. Double-check that the oven door is securely locked before starting the self-cleaning cycle. Proper preparation ensures a safe and effective cleaning process. Always follow GE’s specific guidelines to avoid any potential damage or hazards during the self-cleaning cycle.
Step 2: Activating Self-Clean Mode
To activate the self-clean mode on your GE oven, navigate to the control panel and select the self-clean option. Choose the recommended cleaning time, typically 2-4 hours, depending on soil level. Ensure the oven door is securely locked before starting, as it will automatically lock once the cycle begins. Once activated, the oven will heat to a high temperature, converting grime into ash. Follow the manufacturer’s guidelines to avoid any issues during the process.
Step 3: Monitoring the Cleaning Process
During the self-cleaning cycle, monitor the oven to ensure everything runs smoothly. Check for excessive smoke, which may indicate heavy grime buildup. Keep the kitchen well-ventilated to prevent fumes from lingering. Avoid opening the oven door during the cycle, as it will be locked and extremely hot. The high temperatures will turn food residue into ash, making cleanup easier after the cycle completes. Follow the manufacturer’s guidelines to ensure safety and effectiveness throughout the process.
Step 4: Allowing the Oven to Cool Down
After the self-cleaning cycle completes, it’s crucial to let the oven cool down completely before proceeding. The oven door will remain locked during this phase to ensure safety. Avoid opening the door until it has cooled to a safe temperature, as the interior will still be extremely hot. This cooling period allows residual ash to settle, making the final cleanup more effective. Always prioritize safety by waiting patiently and never forcing the door open while the oven is still hot.
Step 5: Wiping Down the Oven After Cleaning
Once the oven has cooled completely, use a soft, damp cloth to wipe down the interior surfaces. This step removes any remaining ash and residue. Avoid using abrasive cleaners or scrubbers, as they can damage the oven’s finish. For tougher spots, a mild soap solution can be used, but rinse thoroughly to prevent residue buildup. GE recommends using approved cleaning products to maintain the oven’s condition. This final wipe-down ensures your oven is clean, safe, and ready for its next use.
Aftercare and Maintenance
Regularly wiping down the oven cavity and cleaning racks ensures long-term efficiency. Check for residual ash and food particles post-cleaning. Avoid harsh chemicals to maintain the oven’s finish and performance.
Wiping Down the Oven cavity
After the self-cleaning cycle, allow the oven to cool completely before wiping down the cavity. Use a damp cloth to remove ash and food residue gently. Avoid harsh chemicals or abrasive materials, as they can damage the oven’s finish. For tougher spots, a soft sponge or paper towels may be used. Regular wiping helps maintain the oven’s cleanliness and prevents grime buildup. GE recommends using mild, non-abrasive cleaners if necessary. Consistent maintenance ensures the oven remains efficient and ready for future use.
Cleaning the Oven Door and Window
After the self-cleaning cycle, remove racks and accessories to clean the door and window separately. Use a damp cloth to wipe away grime and residue. Avoid harsh chemicals or abrasive materials, as they may scratch the glass or damage the finish. For tougher spots, a microfiber cloth or gentle glass cleaner can be used. Regular cleaning ensures visibility and maintains the oven’s appearance. GE recommends using mild, non-abrasive cleaners to prevent damage and keep the door and window in pristine condition for optimal performance and safety.
Removing and Cleaning Oven Racks
Before self-cleaning, remove oven racks to prevent warping or discoloration. Wash racks with mild soap and warm water, using a soft sponge or brush to remove grime. For tougher residue, soak racks overnight in a mixture of baking soda and water. After cleaning, rinse thoroughly and dry with a clean towel to prevent water spots. GE recommends avoiding abrasive materials to maintain rack quality. Clean racks should be replaced only after the oven has cooled down post-cleaning to ensure safety and proper fit.
Checking for Residual Ash or Food Particles
After the self-cleaning cycle, allow the oven to cool completely to avoid burns. Inspect the interior for any remaining ash or food particles. Use a damp cloth to wipe away residue, ensuring no debris is left behind. Avoid using abrasive materials that could damage the finish. If ash persists, repeat the process or manually clean with a soft brush. Properly dispose of ash and ensure racks are clean and securely placed back. Regular checks maintain oven efficiency and prevent future grime buildup.
Troubleshooting Common Issues
Addressing common problems like excessive smoke or residue ensures optimal performance and safety. Identify root causes and apply targeted solutions to maintain your oven’s efficiency and longevity.
What to Do If the Oven Smokes Excessively
If your GE oven smokes excessively during self-cleaning, ensure proper ventilation by opening windows and using an exhaust fan. Check for any food residue that may have been missed during preparation. Excessive smoke can also indicate high temperatures burning stubborn grime. Reduce the cleaning duration if necessary and avoid using abrasive cleaners, as they can damage the oven’s finish. Always follow GE’s recommended guidelines to prevent damage and ensure safety during the self-cleaning process.
Handling Residue That Doesn’t Turn to Ash
If residue remains after self-cleaning, allow the oven to cool before manually removing it with a damp cloth or soft brush. Heavy grime may require a second cleaning cycle. Avoid using abrasive materials, as they can damage the finish. For stubborn spots, GE recommends gentle cleaning products. Always ensure the oven is empty before starting the cycle to prevent such issues. Regular maintenance can help reduce residue buildup and keep your oven performing efficiently.
Dealing with Lingering Odors After Cleaning
Lingering odors after self-cleaning can be addressed by thoroughly ventilating the kitchen. Open windows, use exhaust fans, or turn on air purifiers to eliminate the smell. After the oven cools, wipe down the interior with a damp cloth to remove any remaining residue. If odors persist, mix equal parts water and white vinegar in a heat-safe bowl and let it simmer inside the oven on a low temperature for 30 minutes. This method helps neutralize unpleasant smells without damaging the oven’s finish.
Maintenance Tips for Long-Term Efficiency
Regularly clean up light grime to prevent heavy buildup. Use self-clean responsibly to avoid overheating. Check racks, walls, and door seals for wear and tear.
Regular Cleaning to Avoid Heavy Grime Buildup
Regular cleaning is essential to prevent heavy grime from accumulating in your GE oven. Wipe down the interior after each use to remove food splatters and spills. This prevents grime from hardening and reduces the need for frequent self-cleaning cycles. Clean oven racks separately with mild soap and water to avoid transferring grime back into the oven. Consistent maintenance ensures the self-cleaning feature works efficiently and minimizes the risk of smoke or residue during the process. Avoid using abrasive cleaners to protect the oven’s finish and functionality.
Using the Self-Clean Feature Responsibly
Using the self-clean feature responsibly ensures optimal performance and safety. Always follow the manufacturer’s instructions to avoid damaging your GE oven. Avoid using abrasive cleaners or scrubbers, as they can harm the interior finish. Only activate the self-clean mode when necessary, ideally during low-usage times, to minimize fumes. Ensure the oven is empty and racks are removed before cleaning. Proper ventilation is crucial to prevent smoke buildup. Misuse can lead to excessive smoke or damage, so adherence to guidelines is essential for maintaining efficiency and longevity of your appliance.
Impact of Self-Cleaning on Energy Efficiency
Self-cleaning ovens, while energy-intensive during the cleaning cycle due to high temperatures, can improve long-term energy efficiency by removing grime that obstructs heat distribution. GE ovens, operating at around 880 degrees, effectively turn food residue into ash, reducing the need for frequent deep cleans. This process minimizes energy waste over time. However, running the self-clean feature too often can increase overall energy consumption. Balancing usage ensures efficiency, making GE self-cleaning ovens a practical choice for eco-conscious homeowners who prioritize both cleanliness and energy savings.

GE-Specific Features and Considerations
GE self-cleaning ovens feature advanced high-temperature cleaning, locking mechanisms, and energy-efficient designs. They require adherence to specific guidelines to maintain performance and longevity, ensuring optimal results and safety.
Unique Features of GE Self-Cleaning Ovens
GE self-cleaning ovens standout with their high-temperature pyrolytic cleaning, reaching up to 880 degrees Fahrenheit, effectively turning grime into ash. They feature advanced locking mechanisms for safety, ensuring the door remains sealed during the cleaning cycle. Additionally, GE models offer energy-efficient designs and user-friendly controls, making the self-cleaning process straightforward. These ovens also come with specialized racks and accessories designed to withstand extreme heat, enhancing durability. Regular use of the self-clean feature, as per GE’s guidelines, maintains oven performance and extends its lifespan, ensuring efficient cooking and minimal maintenance over time.
GE Recommended Cleaning Products
GE recommends using gentle, non-abrasive cleaners specifically designed for self-cleaning ovens to avoid damaging the interior surfaces. Avoid harsh chemicals or abrasive materials, as they can harm the oven’s finish. Instead, opt for microfiber cloths and mild detergents for manual cleaning. GE also suggests avoiding oven cleaners altogether, as they can leave harmful residues. Always consult your GE oven’s user manual for a list of approved cleaning products to ensure safe and effective maintenance without voiding the warranty or causing damage to your appliance.
Special Instructions for GE Profile Ovens
GE Profile ovens require specific care during self-cleaning to maintain their advanced features; Always remove racks and accessories before activating the self-clean mode, as high temperatures can warp metal. For GE Profile models, ensure the oven is completely empty to avoid damage. Use the delay start feature to schedule cleaning conveniently. Avoid using abrasive cleaners or scouring pads, as they can scratch the interior. Regularly wiping up spills prevents heavy grime buildup. Follow the user manual precisely to ensure optimal performance and longevity of your GE Profile oven.
Environmental and Cost Considerations
Self-cleaning ovens reduce the need for harsh chemicals, promoting eco-friendliness. Energy-efficient cleaning cycles also lower utility costs, making them a cost-effective, environmentally responsible choice for modern kitchens.
Eco-Friendly Aspects of Self-Cleaning Ovens
Self-cleaning ovens are eco-friendly as they eliminate the need for harsh chemical cleaners, reducing environmental impact. The high-temperature process converts grime to ash, avoiding toxic fumes. Energy-efficient cycles minimize power consumption, reducing carbon footprints. GE ovens also promote sustainability by extending appliance lifespan, reducing waste. Additionally, eco-conscious materials and responsible manufacturing processes align with environmental goals, making self-cleaning ovens a greener alternative for modern kitchens while maintaining cleaning efficiency and effectiveness.
Cost Savings of Self-Cleaning vs. Traditional Cleaning
Self-cleaning ovens offer significant cost savings compared to traditional cleaning methods. By eliminating the need for harsh chemical cleaners and reducing labor, they minimize expenses. Energy-efficient cycles lower power consumption, reducing utility bills. Additionally, self-cleaning ovens extend appliance lifespan, reducing replacement costs. Over time, these savings justify the initial investment, making self-cleaning ovens a cost-effective choice for long-term efficiency and convenience.
Properly using your GE oven’s self-cleaning feature saves time and effort while maintaining efficiency. Always follow guidelines for optimal results and safety.
Always follow the owner’s manual for specific guidance. Ensure proper ventilation, remove racks, and avoid abrasive cleaners. Lock the oven door before cleaning and monitor the process. Never use the self-clean feature before holidays to prevent potential issues. Regular light cleaning can reduce the need for intense self-cleaning sessions. Adhere to safety precautions to avoid smoke or damage. By following these practices, you maintain your oven’s efficiency and longevity while ensuring a safe and effective cleaning experience.
Additional Resources for GE Oven Owners
For further assistance, GE oven owners can explore official resources like the GE Appliances website for detailed manuals and guides. Websites like Quora and DoItYourself.com offer user experiences and tips. Additionally, appliance repair specialists provide step-by-step instructions and troubleshooting advice. Visiting forums or contacting GE customer support can also address specific concerns. These resources ensure optimal use and maintenance of your self-cleaning oven, helping you navigate any challenges effectively.